Usage
To use the plugin, the apiconnect (apic) command line toolkit must be installed. For installation information, see Installing the toolkit topic in the product documentation.
Step palette
To access this plugin in the palette, click IBM API Management > IBM API Connect.
To understand how to use the API Connect plugin this topic uses two component templates that are available. The two templates are located in a GitHub repository under IBM API Connect/Component.
- Publish Loopback Application
- Release API Product Definitions from Drafts
The API Connect templates provide a starting point for understanding the IBM API Connect plugin. The templates use the online version of BlueMix and requires a valid BlueMix account. See Build for free on IBM Cloud website to create a trial BlueMix account account. The templates requires some prerequisite steps to publish your first definition or project.
Publish Loopback Application
The Publish Loopback Application process takes a previously created Loopback application and publishes it to an API Connect instance. The catalog and application must be previously created on API Manager. Log into your Bluemix account for API Manager. Follow the prerequisite steps to prepare an application for deployment. If the prerequisite steps are followed, many of the predefined values in the template are untouched.
The following prerequisites are required.
- To create a loopback application, follow the steps in the Creating a LoopBack project from the command line which is part of the IBM API Connect documentation. After the steps are complete, the final application name and local folder is acme-bank. Make note of the path to the folder. This information is needed later.
- To create a catalog and app on API Manager, follow the first set of steps one through eight Publishing a project from the command line. It is not necessary to save the catalog and application identifiers. When completed,
- The name of the Catalog is Sandbox, with an ID of sb
- The name of the Application is Acme Bank, with an ID of acme-bank
Note: Do not follow any steps that point to using the command line.
HCL Launch steps
After the prerequisites are completed, the following tasks are done in HCL Launch.

- In the HCL Launch interface install the IBM API Connect plugin. Click tt > Components and then the Templates tab. The API Connect Publish Loopback Application template should be in the template list. Open the template.
- Click Create Component.
- Fill out the form. If the prerequisite steps were followed, many of the required fields can be ignored or require minimal modifications. Specifically,
home_dir/home_dir refers to the path leading up to the required folder or definition. This is the location where the application was created in the create application prerequisite step. The Organization is a modification of your user name. If you are unsure, it can be found in the API Manager console. Update the username and password with your credentials. If the prerequisite steps were not followed, all of the required fields must be edited.
Note: While the Version Source Configuration is required, it is ignored in this template process.
- Click Save.
- Create a new application, attach the newly created Component, assign the Component an agent resource, and run the Publish Loopback Application process.
- You can verify the newly published Loopback application by viewing the products within the Sandbox catalog on the API Connect console.
Note: In apic version 1.0.2, you may experience an authentication error when deploying a Loopback app. If so, refer to the troubleshooting page to resolve the issue.
Template Process
This template is composed of six steps:
- Login
- Set Configuration Variable App
- Set Configuration Variable Catalog
- Publish API Product Definitions
- Publish an Application
- Logout
Release API Product Definitions from Drafts
The Release API Product Definitions from Drafts template takes a previously definition YAML file, saves it to Drafts, and then publishes it to an API Connect instance. The catalog and application must be previously created on API Manager.
The following prerequisites steps prepare a definition for deployment. If the prerequisite steps are followed, many of the templates predefined values may be left untouched.
- Create an API definition from the command line. You can use the directions in the Creating a LoopBack project from the command line topic.
- Open a command line interface and issue the following commands:
apic create --type api --title Loans to create a sample local .yaml definition.apic validate loans.yaml to validate that the .yaml definition file was created correctly.apic create --type product --title "Banking Services" --apis loans.yaml to create the final product definition named: banking-services.yaml. Record the location of this file, this information is needed later.
- Create a catalog on API Connect. Follow the first set of steps one through four here. It is not necessary to save the catalog and application identifiers. When completed, the name of the Catalog is Sandbox, with an ID of sb. The same Sandbox catalog may be reused if it has been previously created.
HCL Launch steps
After the prerequisites are completed, the following tasks are done in HCL Launch.
- In the HCL Launch user interface, install the IBM API Connect plugin, click the Components, and then the Templates tab. The API Connect Release API Product Definitions from Drafts template should be in the template list. Enter the template.
- Click the Create Component.
- Fill out the form. If the prerequisite steps were followed, many of the required fields can be ignored or require minimal modifications. Specifically, refers to the path leading up to the API product definition. This is the location where the product was created in the prerequisite steps. The Organization is a modification of your username. If you are unsure, it can be found in the API Manager console. Lastly, update the username and password with your credentials. If the prerequisite steps were not followed, all of the required will need to be edited.
Note: While the Version Source Configuration is required, it is ignored in this template process.
- Click Save.
- Create a new Application, attach the newly created Component, assign the Component an agent resource, and run the Release API Product Definitions from Drafts process.
- The newly published API product definition can be verified by viewing the products within the Sandbox catalog on the API Connect console.
Note: The loans.yaml file created in the prerequisite steps, might not have the correct gateway assigned causing an error to occur while pushing or publishing a API definition. Refer to the troubleshooting page to resolve this issue.
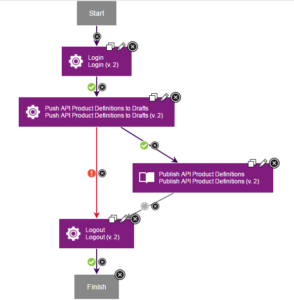
Template Process
This template is composed of four steps:
- Login
- Push API Product Definitions to Drafts
- Publish API and Product Definitions
- Logout


 Troubleshooting
 Usage
Usage
 Steps
Steps
 Summary